Spinach Garlic Egg Noodles & Raviolis
- redbirdfarm
- Jan 23, 2020
- 10 min read
Sometimes, I plan recipes. I think, "I want this thing, so I'll get these four ingredients at the store, then I'll make it." It seems so...adult, and planned, and coherent. The idea is very alluring to me. However, when I say "sometimes", I mean like 5% of the time. Mostly, I'm looking in my fridge and throwing shit together, hoping it comes out alright and I didn't just waste the last of [insert ingredient here] for no reason. This recipe is one of that variety, the "oh no, I need to use this spinach before it goes bad" kind.

Ricotta, mozzarella, parmesan, caramelized onion, garlic powder, spinachy GOODNESS.
Making pasta without a pasta roller is sort of a pain in the ass, so I don't do it all the time, but it's alright. It's not like when I tried to make macarons for soooo long then gave up because it's impossible to turn out delicious and beautiful (for me, anyway).
Recipe
Ingredients:
4-5 cups of fresh spinach*
2 eggs and 1 egg yolk
1 teaspoon salt
5-8 cloves of garlic**
2-3 tablespoons olive oil
2 cups flour, plus ~1/3 cup for dusting***
1-2 tablespoons lukewarm water
Directions:
Preheat oven to 375°F.
Peel garlic cloves, put them in a tinfoil pouch, add olive oil – you want enough to coat them but not so much that they're swimming in oil.
Put in oven, keep an eye on them, when they look golden and soft, take them out (somewhere between 5-20 minutes, depending on size of cloves and how evenly your oven heats) and let them cool a bit.
Put your spinach into a food processor; the measurement is approximate because I just put as much as I could squish in there. Add the garlic cloves – don't pour the extra oil in there, but don't feel like you need to make sure they are dry before you put them in there. Run processor until everything is pretty smooth.
Add your two eggs and one egg yolk. Save your egg white if you think you'll use it for something else in the next 2-3 days, or do what I do and feed it to your dog (egg whites contain biotin, which is excellent for your dog's coat. Full raw eggs are also good for your dogs, but beware the egg farts...I personally won't feed the dogs eggs with dinner since they sleep in bed with me and I get gassed out while trying to sleep.) Run processor until everything is relatively uniform.
In a stand mixer, mix your 2 cups of flour and salt together, then make a little well in the middle of your flour so the sides are higher than the center.
Pour the spinach/garlic/egg mixture into your well, and use a dough hook on a low speed to combine.
Once everything is combined, you may notice it's sort of crumbly, depending on how much spinach you used, how large your eggs are, how much oil went in with the garlic. It should be in a few big chunks, looking like a sort of sticky dough. If you have a lot of small pieces, add water a tablespoon at a time, combining fully before thinking about adding more. You can always add more water, you can't take it away! Add slowly and carefully.
Sprinkle some flour onto a cutting board and put your dough on it. Knead until dough is one solid item, adding flour as you need – you want your dough to be a tiny bit sticky, uniform, and to be a little stretchy as you go. If you find your dough is ripping quickly when you knead, keep going until it has a little more stretch. I kneaded for approximately 5-8 minutes.
Wrap your dough in plastic wrap to let the gluten bonds strengthen, allow to sit at room temperature for 20 minutes to an hour.
After the dough has rested, sprinkle out some more flour on your cutting board, knead the dough a few more times (1-2 mins). Separate the dough into 3 or 4 sections, put some flour on your rolling pin, and roll your dough out. Thinner is better, but because of the high spinach content, you likely won't get the dough INCREDIBLY thin. If you roll it too thin and it's breaking, knead it back into a ball and roll out again.
Here's where you can get creative – I personally find that pappardelle is the easiest shape to make, which is a flat, wide noodle. You can dry your pasta a little bit before you cook it by hanging it on a wooden dowel (I've used a series of wooden spoons balanced on tall mason jars with success, whatever you can find that works, but I find the noodles don't dry evenly if you put them on plastic, so stick to wood for drying). This would also be delicious ravioli dough, filled with ricotta and any herbs/veggies you find delicious. Drying your pasta is optional, but if you plan to make more than you'll be eating tonight, I'd recommend drying it, then putting it in the fridge for up to 3 days before cooking. Drying prevents the pasta from sticking to each other when you put them into a tupperware or zip bag.
Make sure you have a large pot of water at a rolling boil, with a generous pinch of salt in there – you don't want your water to stop boiling when the pasta goes in, so make sure you have a large enough pot with enough water to not get too cold with pasta going in. Fresh pasta takes much less time to cook than dried, so stick around! It's usually ready once it floats, but taste it and see what you think.
Notes:
* Frozen spinach can be used here as too, just make sure it's fully thawed and squeeze it in a strainer to get as close to all of the water out as possible. You'll need less of it, the end goal is around 1.5-2 cups of egg/spinach/garlic purée .
** Roasted garlic, in my opinion, is the best flavor here. Feel free to skip if you're not a garlic person (though, we can't be friends if you aren't, sorry, that's a hard requirement of my friendships) or use 2-3 teaspoons of garlic powder if you don't have fresh garlic. Skip steps 1-3, and add a teaspoon of olive oil to your spinach mixture when blending.
***I used whole wheat flour here because I had it and wanted to finish up the bag I had open, but all purpose would be fine as well. Don't use bread flours with anything included for rising, you don't want noodles that rise (well, you could try it, but the texture may be a little odd). I don't believe gluten-free flours will stick together as well as we need here for the stretching, but if anyone tries this with a gluten-free flour, I'd love to hear how it goes or what you changed to make it work!
Here is a list of 86 different kinds of pasta. Some are made with a specific ingredient, some require a pasta machine or attachment to make, but if you need inspiration, this is an incredible list!
Making your spinach mixture:


I added my eggs right at the beginning, which made them super fluffy by the time the spinach broke down. Doing this again, I'd blend the spinach/garlic THEN add the eggs to prevent that, I think it puts a little strain on the structure of the eggs which will make a less smooth pasta dough. Egg white and kibble for Willow breakfast!
Making your dough:


Left to right: flour well with spinach/egg/garlic mix, dough before adding water, dough after adding ~2 tablespoons of water. The amount of water you'll need to add (if any) will vary, but the dough in the middle is too dry, and the dough on the right is what you want to aim for in consistency. It could even be a little wetter, but I didn't want to make it too wet so I stopped there.
Making your noodles:


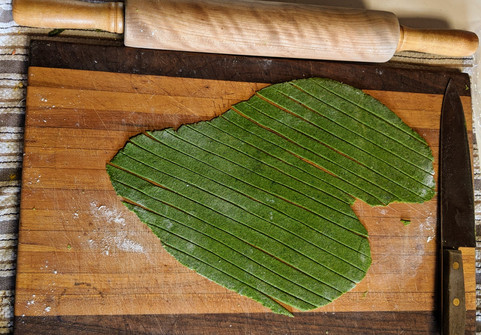


I'd recommend cutting your dough into four pieces so that your rolled-out piece doesn't exceed the size of your cutting board (unless you have a MASSIVE cutting board, then, by all means, roll out whatever percentage of the dough you want). To make pappardelle, just get a sharp knife out and make (somewhat) straight cuts. You can use a ruler if you really want, or a pizza cutter if you find that's easier. I was given a ravioli rolling pin as a gift a few years ago and just remembered I had it in the back cabinet of baking containers/supplies, so I also made little ravioli squares. I ended up making half and half ravioli and pappardelle, so two iterations of rolling out balls per pasta type.


In step 11, I mentioned that you likely wouldn't be able to get the pasta SUPER thin. This is the thickness I rolled out to. It's approximately 3/16 of an inch - I maybe could have gone a TOUCH thinner on the pappardelle, but I think the raviolis would have ripped if they were any thinner. Also, my arms were tired. It's a thick and dense dough, therefore, a workout to get as thin as possible with a rolling pin.
Want to make raviolis?


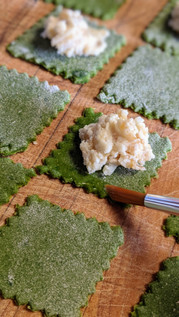


A ridiculous question, I know. OF COURSE you want to make raviolis. Look how cute they are! The rules of raviolis are:
You don't need as much filling as you think you do. This goes for making the filling and for putting it into the raviolis.
There are no rules for what you have to put into a ravioli. Go nuts. Put your wildest flavors in there! Cheese? Meat? Veggies? FRUIT?! Whatever you want. It could be gross OR it could be the world's greatest ravioli. You won't know til you try.
You really really really should crimp the edges of your raviolis so your filling doesn't explode out in your boiling water, leaving you with empty ravs and sadness.
That's it. I grabbed the three cheeses I had available in my fridge (ricotta, mozzarella, and parmesan), caramelized some onions (chopped very finely), added some salt and garlic powder, and added micro-spoonfuls to every other ravioli-to-be-square. Measurements aren't important (because I didn't measure), but it's probably 2/3 cup ricotta, 1/4 cup mozzarella, 1/4 cup parmesan, a teaspoon of salt, and a tablespoon of garlic powder, with 2 small yellow onions chopped SUPER fine and sauteed in bacon fat (because how could anything be better than bacon fat onions). Mix until it's uniform. I know there's no rules to ravioli filling, but I personally require ricotta because it's so smooth and delicious, and holds everything together so I'm not spilling my filling all over the place trying to get it inside little noodle squares.
Once your filling is on the noodle, brush the edges of the noodle with a little water (I used a clean paintbrush for ease, but you can also dip your finger in water and do it that way), and pick it up and gently squeeze the edges closed. You don't want a puddle, just enough to get the dough wet and a bit sticky. I would wet 4-5 noodles at a time, then crimp them closed, set aside, and move onto the next 4-5 noodles, so that the water didn't have a chance to dry before I attempted to use it as ravioli glue.
When all your pouches have been pressed closed, grab a fork and gently press down on the edges. You don't want your fork to go all the way through your noodle, but you do want it to push into both layers of noodles on the edge. Go around all four sides until it's fully crimped. Don't go too far in from the edge or you could burst your ravioli filling bubble (refer back to Ravioli Rule #3 for filling-sadness-avoidance).


Drying noodles:


"Do I need to dry my noodles?" - no.
"Okay, if I don't need to, why would I dry my noodles?" - drying noodles helps them not stick together while you're cooking, or if you are making noodles to eat at any date later than "right now, this very minute."
USE WOODEN UTENSILS TO HANG YOUR NOODLES! The first time I made noodles at home, I thought "I can just get a big stick from outside and put plastic wrap on it for sanitary reasons, that will be fine" and I was wrong. The noodles all stuck to the plastic, broke, and everything dried except what was touching the plastic, so I had weird wet spots on my otherwise-dried pasta, which of course had broken at the wet spot, then stuck together when I tried to put it in the fridge to eat later. Never again. Direct wood-to-noodle contact always.
I didn't weigh any of this, but looking at my pile of noodles, I'll tell you this is at least two meals for Charles and I, especially since the raviolis have filling in addition to being a lot of pasta. Also, I made these at 9 am instead of working like I was supposed to be, and while I would never discourage or judge morning pasta, I wasn't feeling it today. So, I dried my noodles. The pappardelle is going into a tupperware in the fridge to be another night's dinner (or another morning's breakfast, pasta is delicious at every single hour in the day). Theoretically, it could last a while in there, or you could freeze it (but I'm not sure if you should thaw before cooking or throw it right in, I personally haven't tried it to know if the texture changes). In practice, I wouldn't leave it for more than 2-3 days before you eat it, or the texture could get a little wonky.
Cooking fresh pasta:
Don't go anywhere. Seriously, don't leave your pasta unattended. Dried pasta from a box takes WAY more time to cook than fresh pasta, and fresh pasta overcooked is like super chewy, ultra gross taffy. We're not talking 12-16 minutes here. Fresh pasta should float when it's done, but I taste it to be sure it's delicious and will usually let it go for another minute after it's floating. I cooked my raviolis for three and a half minutes, which is the right amount of tenderness for me without being soggy, but you'll know how you like your pasta! I'd guess the papparadelle will be ready in about two and a half minutes.
It's also important to get a good, rolling boil for fresh pasta, and to use a pot large enough that you can keep the temperature up when cold pasta is added to it. Fresh pasta has more of a tendency to stick to the bottom of the pot and to each other than dried pasta. You can add some oil to your water if you really want to, but that prevents any sauce from sticking well, so I'd recommend not adding oil. The big rolling boil keeps your pastas up and moving, so they're less likely to stick to the bottom, and I'd stir them around a bit when they first go in to be sure they aren't sticking anyway.
Also, salt your pasta water. I don't know why, it's the rule. Every pasta in the history of the world tastes better when it's cooked in salty water. Enjoy!


Comments